Applying makeup is a familiar ritual for many, as it often begins in childhood with a curiosity for the colorful palettes found in a mother’s collection. This early fascination evolves into a daily practice, allowing us to master the essentials by adulthood. However, despite this proficiency, there is often a noticeable distinction between everyday makeup application and the refined techniques employed by professionals.
Recognizing this, we’ve compiled seven makeup tutorials designed to elevate your skills to a professional standard. These comprehensive guides offer a variety of tips, from skincare fundamentals to the finesse of a flawless finish, ensuring a step-by-step pathway to achieving that coveted expert touch. Whether you’re a beginner or looking to refine your technique, our tutorials provide a roadmap to enhance your makeup routine, including the use of brushes, mascara, and lipstick for a stunning transformation.
Chapter Overview
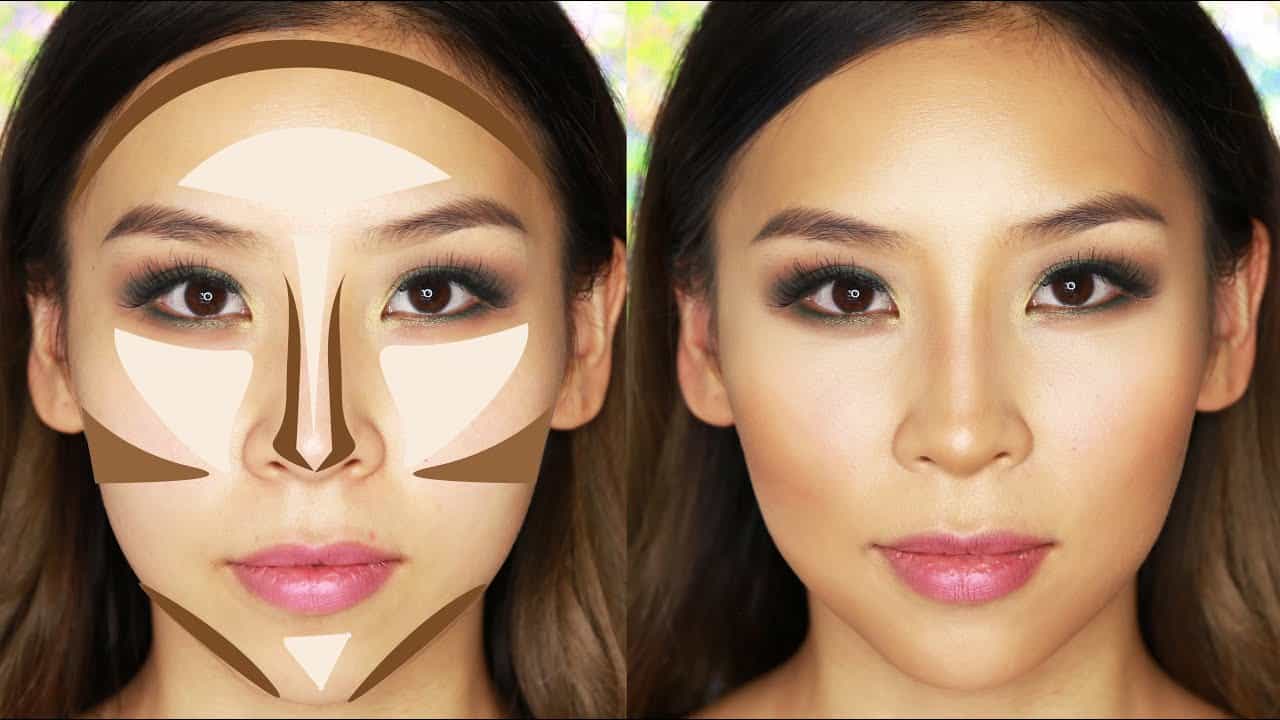
How to Contour – Beginners Guide
Contouring is a technique that adds depth to your facial features. It’s particularly useful for photographs where you want to bring out your natural bone structure. We use a matte bronzer to create these shadows because it absorbs light, while shimmer can reflect light and disrupt the natural-looking shadow we aim to achieve.
Here are the steps and tips for effective contouring:
- Choose Your Tools: A contour brush with angled bristles is ideal for precise application.
- Selecting the Shade: Go for bronzers that are two shades darker than your skin tone for a natural shadow effect.
- Application Points:
| Area | Application |
|---|---|
| Forehead & Temples | Apply along the sides to balance face shape. |
| Below Cheekbones | Create the illusion of lifted cheeks. |
| Jawline & Chin | Define the lower face edges for sharpness. |
- Blend, Blend, Blend: Ensure there are no harsh lines by blending thoroughly with a clean, fluffy brush.
Remember, the aim of contouring with bronzers is not to change but to enhance your facial structure subtly. Keep your hand light and build up intensity gradually.
How to Contour Like Kim Kardashian
When we look to emulate Kim Kardashian’s contouring technique, it’s all about accentuating our features for that glamorous evening look. Here’s a simplified approach:
- Prep your skin: Ensure your face is clean and primed.
- Foundation as a base: Apply your normal foundation for an even canvas.
- Contouring basics: Use a contour stick or powder slightly darker than your skin tone.
- Cheekbones: Apply along the hollows of your cheeks.
- Jawline: Shade just beneath your jaw.
- Forehead: Sweep lightly around your hairline.
- Nose: Define the sides if desired.
- Blend: Use a makeup sponge or brush to blend for a natural appearance.
- Highlight: Apply highlighter to the tops of your cheekbones, bridge of the nose, and cupid’s bow.
- Set: Lightly dust your face with setting powder to finish.
Remember, the key to perfect contouring is blending well for that seamless transition of shades.
How To Apply Foundation
Step 1: Prep Your Skin
- Moisturize: Apply moisturizer suitable for your skin type to hydrate.
- Primer: Use a makeup primer to create a smooth base.
Step 2: Choose the Right Shade
- Test: Match foundation to your jawline for the perfect shade.
Step 3: Application
- Dot: Apply liquid foundation in dots on the face.
- Tools: Use a beauty blender or brush for blending.
- Blend: Start from the center, blend outwards for even coverage.
Step 4: Conceal
- Blemishes: Hide blemishes or redness with concealer.
- Blend: Tap gently with a finger to blend without wiping off.
Step 5: Set Your Foundation
- Setting Powder: Dust a thin layer to set makeup.
- Longevity: Helps makeup stay in place and last longer.
Tips
- BB Cream: For lighter coverage, opt for a BB cream instead.
- Skin Type: Consider matte formulas for oily skin and hydrating ones for dry skin.
Basic and Simple Eyeshadow
Achieving a polished eyeshadow look is a skill that elevates our makeup game. For beginners, it’s imperative to master a basic eyeshadow technique before exploring advanced styles:
- Start by selecting a neutral eyeshadow palette suitable for your skin tone.
- Apply a primer on your eyelids to ensure the eyeshadow adheres properly and lasts longer.
Step-by-Step Application:
- Base Layer: Use a light-colored shade and apply it over the entire eyelid as a base.
- Mid-Tone: Choose a slightly darker shade and blend it into the crease for definition.
- Highlight: Add a touch of the lightest shade beneath the brow bone and in the inner corner of the eye to brighten.
- Blend: Make sure to blend the edges of the eyeshadows seamlessly to avoid any harsh lines.
For optimal results, experiment with different brushes for application and blending. Our goal is to enhance our natural eye shape and create depth with minimal effort. Remember, practice makes perfect!
Product Suggestions: Opt for eyeshadows with a smooth, pigmented formula and long-wearing capabilities. Beginners need to work with formulations that are forgiving and blendable.
SEE ALSO: 12 Eyeshadow Tutorials For Perfect Makeup
Blush –Dos and Don’ts
- Dos:
- Sweep blush along cheekbones for a round face.
- Apply blush just below the apples for a heart-shaped face.
- Use a clean palette before application for a fresh look.
- Don’ts:
- Avoid the apples of your cheeks; it can alter face proportions unfavorably.
- Don’t overshadow your highlight by applying blush too close to it.
Remember, the technique matters to achieve a harmonious highlight and blush combination.
How To Fill In Eyebrows
To ensure our brows have the volume and definition we desire, we can use these steps:
- Choose the Right Tools: Opt for a fine-tip eyebrow pencil or a pigmented brow powder with an angled brush for precision.
- Identify Sparse Areas: Look for patches in the brow where hair is less dense.
- Outline: Using light strokes, outline the upper and lower edges of the brows to create shape.
- Fill in: With short, hair-like strokes, fill the sparse areas. Start from the inside corner and follow the natural arch.
- Blend: Use a spoolie brush to blend the color and soften any harsh lines for a natural look.
- Set Brows: Apply a clear or tinted brow gel to set the hairs and the color in place.
Remember, less is more for a natural appearance.
How to Blend Eyeshadow Like a Pro
- Start by applying a primer to create a smooth canvas.
- Use a fluffy brush for blending in circular motions.
- Transition colors should go from light to dark toward the outer corner of the eye.
- For a cut-crease, keep the darkest shade above the actual crease, blending outward.
- Create a halo eye by placing a lighter shade in the center of the lid and blending the edges.
- Winged liner should be sharp; clean any fallout to avoid smudging.
- Blend edges with a clean brush for a seamless finish.
- Remember, practice makes perfect. Keep experimenting to find what works best for you.