Eyeshadow has the power to transform a makeup look, yet many shy away from it, fearing a complicated application process. We’ve observed the hesitancy around this key cosmetic element and want to simplify the approach. Whether you’re brandishing a ColourPop shimmer, a Maybelline matte, or toying with the idea of a high-stakes evening look with Pat McGrath Labs, our aim is to guide you toward becoming an eyeshadow aficionado. With a focus on empowering both beginners and seasoned beauty enthusiasts, we’ll explore the spectrum of palettes available and the impact of highly pigmented shades.
Our expertise draws from the finesse of celebrity makeup artists and the practical wisdom of travel-friendly makeup hacks. The NYX Professional Makeup Jumbo Eye Pencil, known for its versatility, and the cult-favorite Anastasia Beverly Hills palettes will be highlighted for their transformative abilities. From understated, subtle looks to creative and vibrant expressions, we’ll share the foundational knowledge to ensure your eyeshadow makes a statement that’s uniquely yours, unveiling the finesse required to wield the brush with confidence.
Chapter Overview
1. Perfect Peach Eyeshadow Tutorial

For a simple and elegant look perfect for spring, we’re focusing on pastel hues, particularly a peach eyeshadow, which is flattering for both brown and blue eyes. Here’s our step-by-step guide:
What We Need:
- Matte white eyeshadow
- Peach eyeshadow
- Pointed brush
- Angled shadow brush
Step-by-Step Instructions:
- Base Preparation:
- Sweep matte white eyeshadow across the upper lid using a pointed brush. This step ensures an even canvas for the peach hue.
- Applying Peach Eyeshadow:
- With the same pointed brush, apply your favorite peach eyeshadow in the crease to define the eyes.
- Blending:
- To create a seamless transition, take your angled shadow brush and carefully blend the edges where the peach meets the white.
- Highlighting:
- Apply the matte white eyeshadow on the top third of the lid to brighten and add dimension.
- Final Touches:
- Finish off with a coat of mascara to enhance the lashes and complete your eye makeup look.
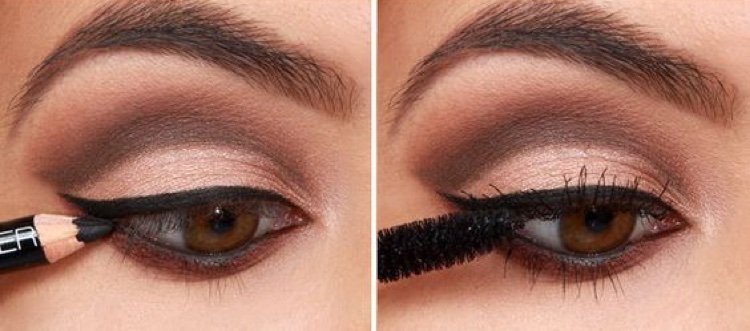
2. Brown Cut Crease with Eyeliner
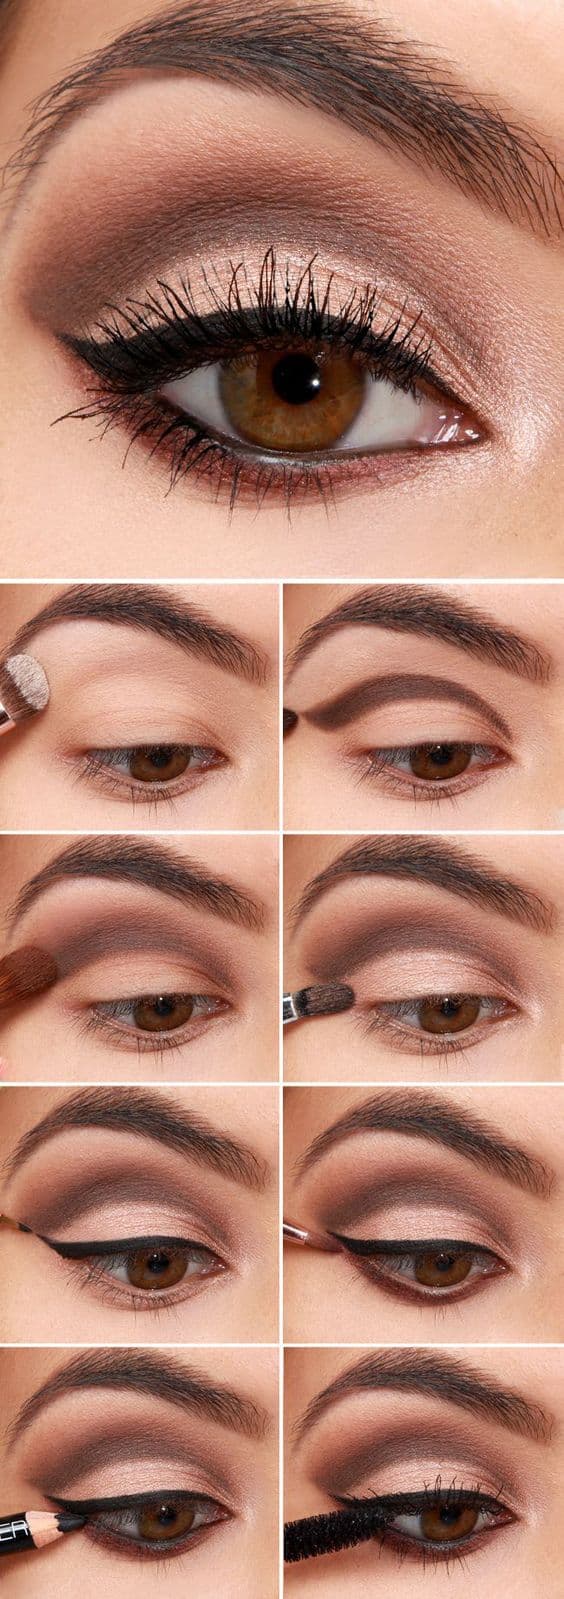
To achieve a simple yet stunning brown cut crease with eyeliner, we’ll need the following:
- Essentials:
- Eyeshadow primer
- Big blending brush
- Brown eyeshadow
- Slightly shimmery tan eyeshadow
- White shadow base
- Pencil brush
- Black eyeliner
Here are our step-by-step instructions:
- Begin with a layer of eyeshadow primer over the eyelids to ensure longevity.
- With a big blending brush, softly sweep the brown eyeshadow in and above the crease, blurring any harsh lines.
- To add dimension, blend a touch of slightly shimmery tan eyeshadow along the same area, but not quite as high as the brown.
- Apply a white shadow base onto the lids with your finger, focusing on the center, to amplify the eyeshadow’s color.
- Define the eyes with the black eyeliner by drawing a wing on the upper lid and lining the bottom lash line.
- Finish with mascara to enhance the lashes, completing the cut crease look.
For a seamless integration of these elements, we ensure the brown tones are moderated, and the wing is sharp and defined. This quick technique is perfect for both everyday and casual looks.
3. Green Eyeshadow Tutorial
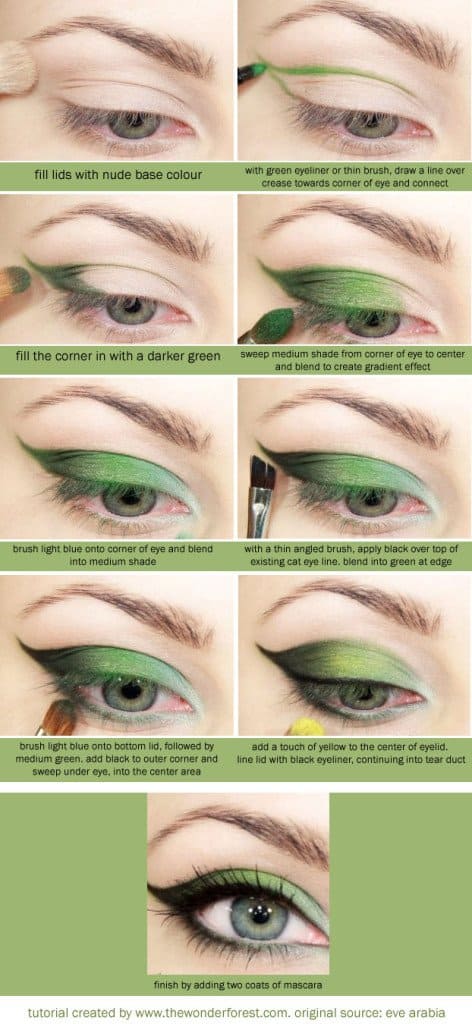
We start by prepping our lids with a nude base color which will help to intensify the eyeshadow and ensure longevity. Next, we take a green eyeliner or a thin brush to trace a line above the crease, extending towards the outer corner of the eye and connecting back to the lash line to create definition.
| Step | Action |
|---|---|
| 1 | Apply a nude base color over the lids. |
| 2 | Draw a line over the crease with green eyeliner. |
Now, let’s add dimension by applying a dark green eyeshadow on the outer corner of the eye, blending it into the crease. We follow by sweeping a medium green shade from the outer to the center and blending for a monochromatic gradient effect.
- Use darker green eyeshadow on the outer corner.
- Blend with medium shade green eyeshadow towards the center.
We then introduce a dash of light blue eyeshadow on the inner corner and seamlessly merge it into the green. Here, we are layering textures for a shimmer effect.
- Integrate light blue eyeshadow into the inner corner, blend with green.
With a thin angled brush, we enhance the lash line by applying black eyeliner over the existing line, blending slightly with the green at the edges. Extend the line into a sharp wing for that cat eye look.
- Apply black eyeliner over the cat eye line and blend the edges.
Underneath, we repeat the color scheme—light blue followed by medium green, and finish by smudging black on the outer under eye, fusing into the center.
For a pop of sparkle, we pat yellow glittery eyeshadow onto the center of the lid. This step will capture light and add dimension.
- Add yellow glittery eyeshadow to the center of the lid.
Final touches include lining the upper lash line with black eyeliner, stretching into the inner tear duct, and applying two generous coats of mascara to elevate our lashes.
- Line upper lash with black eyeliner and apply mascara.
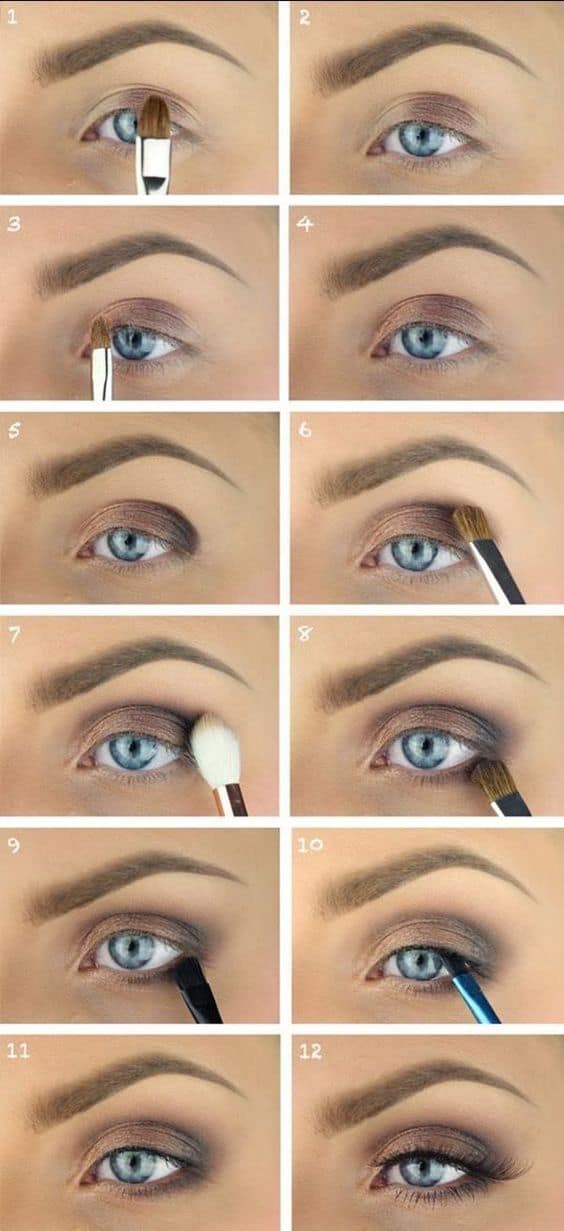
4. Simple and cute smokey eye
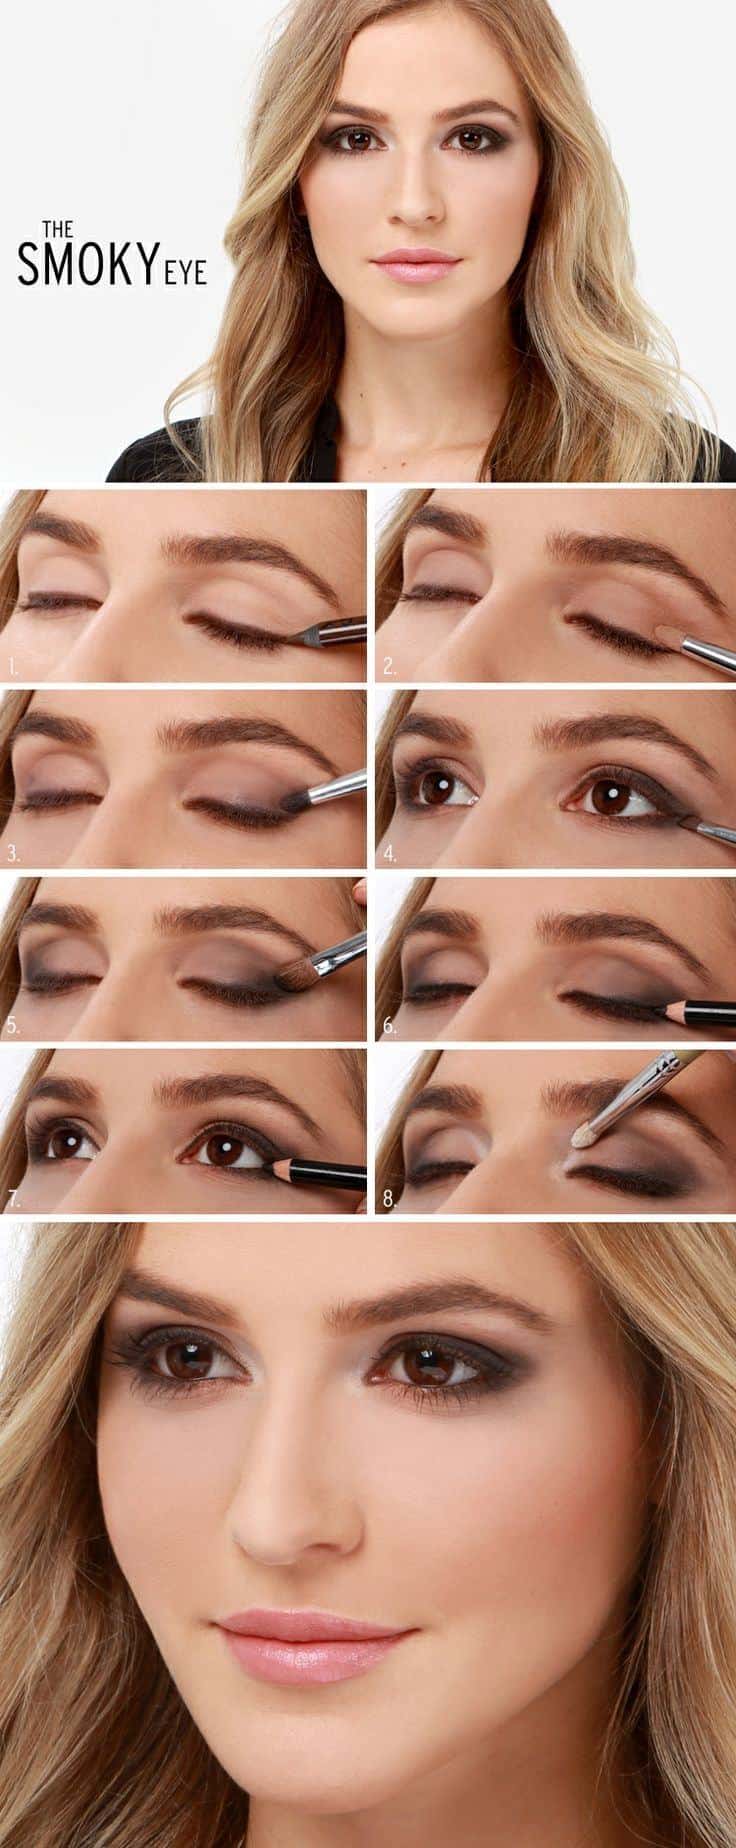
Tools and Materials:
| Tool/Material | Use |
|---|---|
| Brown eye pencil | Upper lid lining |
| Eyeshadow brush | Base application |
| Hazelnut brown shadow | Upper lid base |
| Color pop eyeshadow | Choice of violet, blue, or charcoal for pop |
| Angled precision brush | Precise bottom lash line application |
| Black eyeliner | Lash line definition & waterline application |
| Small brush | Inner corner highlight |
| White eyeshadow | Inner corner brightening |
Creating the Look:
- We start by lining our upper lid with a brown eye pencil for a natural definition.
- Applying hazelnut brown eyeshadow all over the upper lid serves as our foundation.
- For a personalized touch, we choose between violet, blue, or charcoal shade to add a pop of color. We create a “C” formation on the outer corner of the lids with the selected shade.
- Continuing with the chosen color, we trace around the bottom lash line aiming for seamless connection using a small angled precision brush.
- A smoky crease is achieved using black eyeshadow, focusing on a small triangular section on the outer corner for deeper dimension.
- We intensify the look by re-lining the upper lash line with black eyeliner.
- Applying the black eyeliner to the waterline adds dramatic depth to our eyes.
- A dab of white eyeshadow applied with a small brush in the inner corners makes the eyes stand out.
- We complete our smokey eye makeup with coats of mascara to both upper and lower lashes.
Refer to this tutorial for visual guidance on creating a cute and effortless smokey eye.
5. Nude Brown Eyeshadow For Blue Eyes
We recommend using a nude brown eyeshadow palette to accentuate blue eyes. Here’s how to achieve the perfect look:
Essentials:
- Small and medium eyeshadow brushes
- Nude and light brown eyeshadows
- Brown eyeliner
- Mascara
Application Steps:
- We apply the nude brown eyeshadow using the small brush across the entire upper lid.
- We smudge the eyeshadow from the center towards the corners of the eye.
- With a bigger brush, we layer a slightly darker brown shade over the initial application.
- In the outer corner, we use a matte brown eyeshadow to smudge and create a soft, smoky effect.
- We enhance the lash line with brown eyeliner for added definition.
- Our final touch is a swipe of mascara, which brings the entire look together.
This neutral base offers a subtle contrast that makes blue eyes truly stand out.
6. All Nude Makeup Tutorial by Teni Panosian
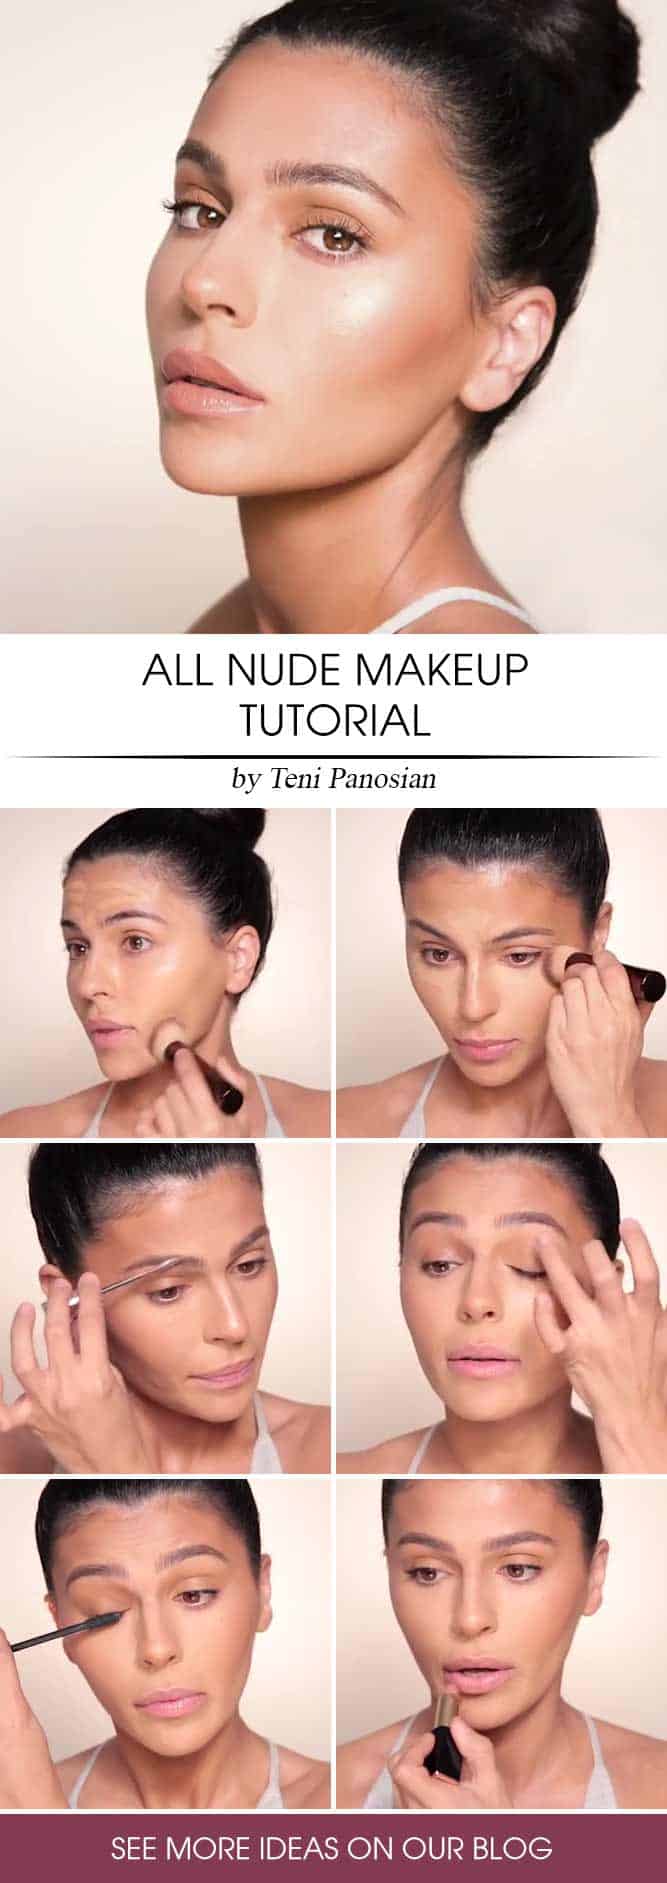
For a seamless transition into an everyday elegant look, we can employ a selection of neutral eyeshadow and shimmery neutral shades conducive to that coveted natural look. Our guide will walk through creating a refined soft glam with a staple neutral palette.
Essentials:
- Moisturizer
- Primer
- Foundation (matching your skin tone)
- Creamy bronzer
- Creamy peachy nude blush
- Highlighter
- Concealer
- Tinted brow gel
- Soft eyeliner (dark brown or black)
- Nude matte eyeshadow
- Mascara
- Blending Brush
Steps:
- Foundation First: Begin with moisturized skin, followed by primer, to set the stage for long-lasting makeup. Apply your choice of foundation and blend evenly.
- Contour and Highlight: Use creamy bronzer for contouring under the cheekbones and around the hairline. Highlight your face’s high points with concealer and blend thoroughly.
- Eyes and Brows: Define your eyes with soft eyeliner along the upper lash line, and opt for a nude matte eyeshadow on the lids. Set your brows with tinted gel for a full appearance.
- Finishing Touches: With a gentle hand, add a creamy peachy nude blush on the cheeks, finalize with a dusting of finishing powder to prevent creasing, and subtly apply highlighter for a natural sheen.
- Mascara Accent: Apply mascara, focusing on the outer corners to enhance the eyes’ natural shape.
By following these steps, we achieve a polished, natural eyeshadow look perfect for any day.
7. Smokey Taupe Eyes tutorial
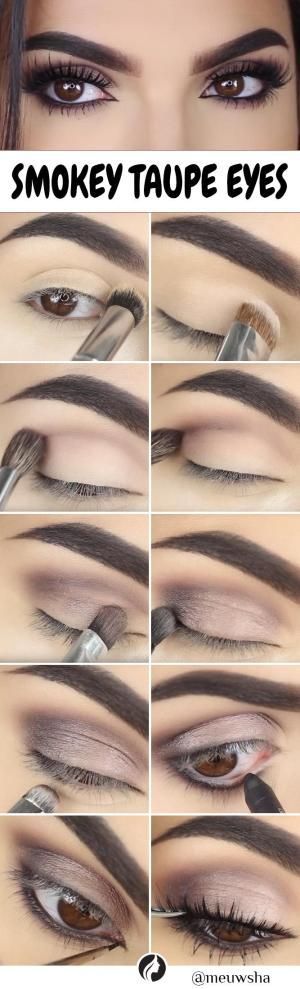
Begin by applying a nude eyeshadow as the base from the lash line to the brow bone. For an enhanced effect, we’ll add a colored eyeshadow of your choice for a glossy lid look. Sweep this over the eyelid, focusing on the center for a subtle pop.
Utilize a matte shadow to deepen the crease and define the outer half of the eyelid, creating a dimensional finish. For added definition, we trace the upper lash line with black eyeliner, winging it out at the corners. To brighten the eyes, we apply a highlight to the inner corners, giving the appearance of more awake and vibrant eyes.
Complete our smokey taupe look with a coat of your favorite mascara.
8. Glittery Black Glam
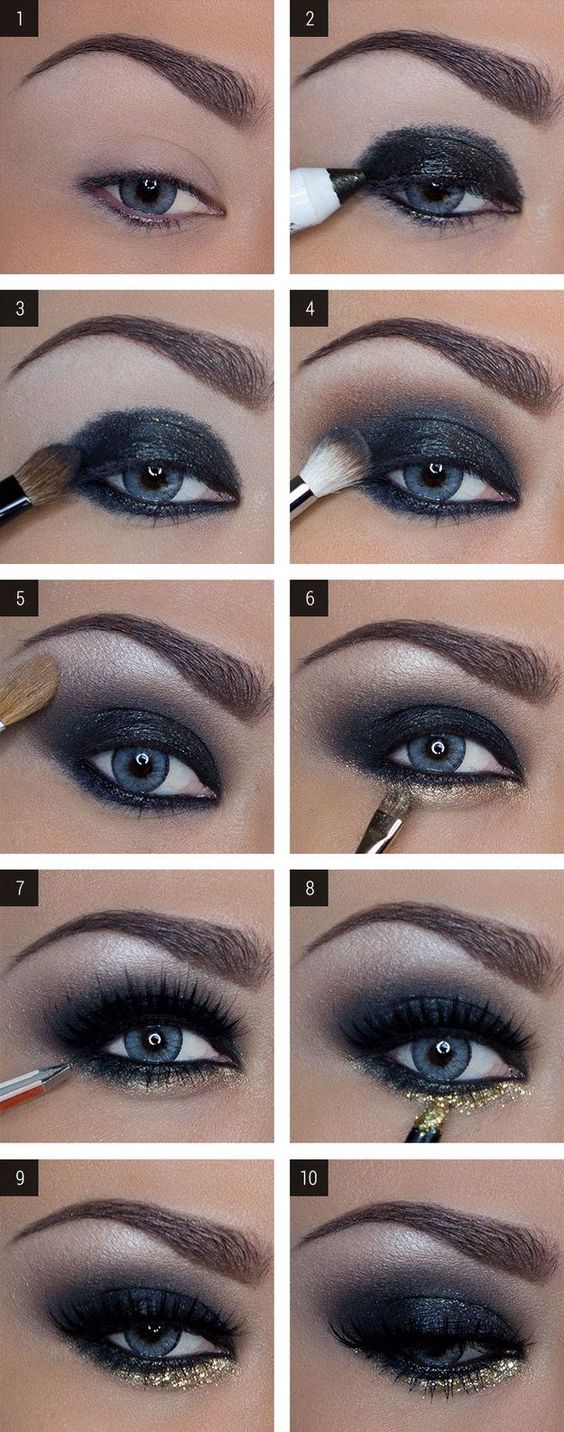
For a stunning cocktail event presence, we recommend embracing the glittery black glam look. This eye-catching makeup style ensures you remain the center of attention.
Essentials:
- Black glitter eyeshadow pen
- Fluffy brush
- Eyeshadows in champagne and gold shades
- Additional glitter
- Black eyeliner
- Mascara
Directions:
- We start with the black glitter eyeshadow pen, sweeping it across the eyelid.
- Using a fluffy brush, we blend outwards for a smooth transition.
- We then pat champagne eyeshadow across the brow bone.
- The gold eyeshadow is applied and blended under the lower lash line.
- We layer more glitter on the lid to enhance the sparkle.
- To define the eyes, we trace them with black eyeliner and apply mascara for voluminous lashes.
Pair this look with a chic dress to create a show-stopping ensemble.
9. Tropical Teal Eye Shadow Look
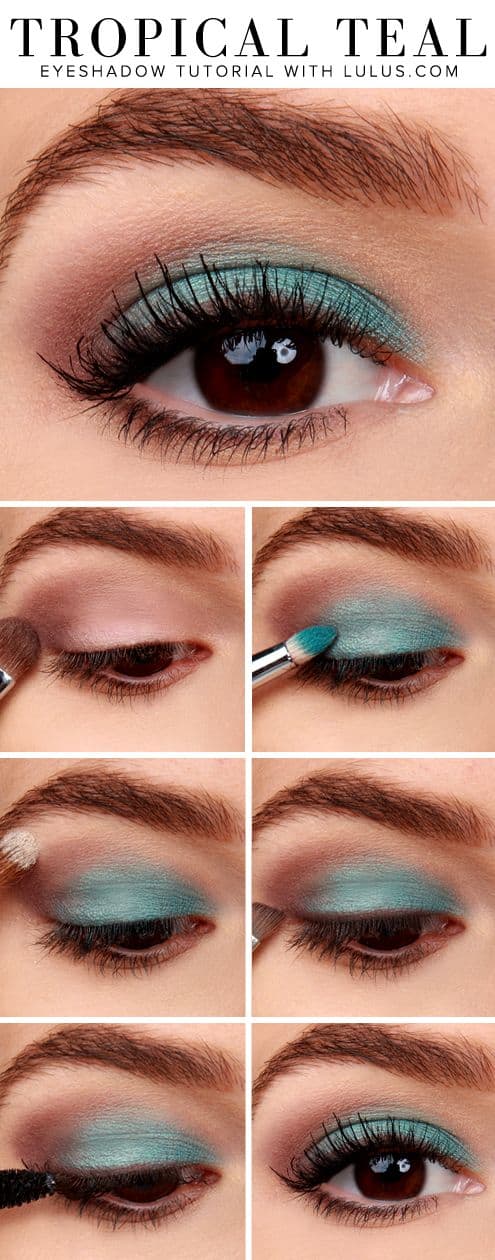
Inspired by the vividness of crystal waters and sandy beaches, we have created a tropical teal eyeshadow look perfect for summer evenings. This exotic application adds a pop of color that embodies the spirited essence of a tropical getaway.
What you’ll need:
- Neutral brown eyeshadow
- Shimmery teal eyeshadow
- Matte beige eyeshadow
- Dark brown eyeshadow
- Black mascara
- Eyeshadow brush
Steps to Achieve the Look:
- Apply neutral brown eyeshadow as a base on the crease and outer corner of the eyelid.
- Layer shimmery teal eyeshadow onto the center of the upper eyelid to give a splash of color.
- Highlight the brow line with matte beige eyeshadow while blending into the base to soften and define the eye shape.
- Use dark brown eyeshadow to meticulously line the upper lash line, adding depth to the eyes.
- Complete the look with a swipe of black mascara for fuller lashes.
Experience the vibrancy of colorful eyeshadow and let your eyes echo the hues of a tropical paradise.
10. Golden Smokey Eyeshadow Tutorial
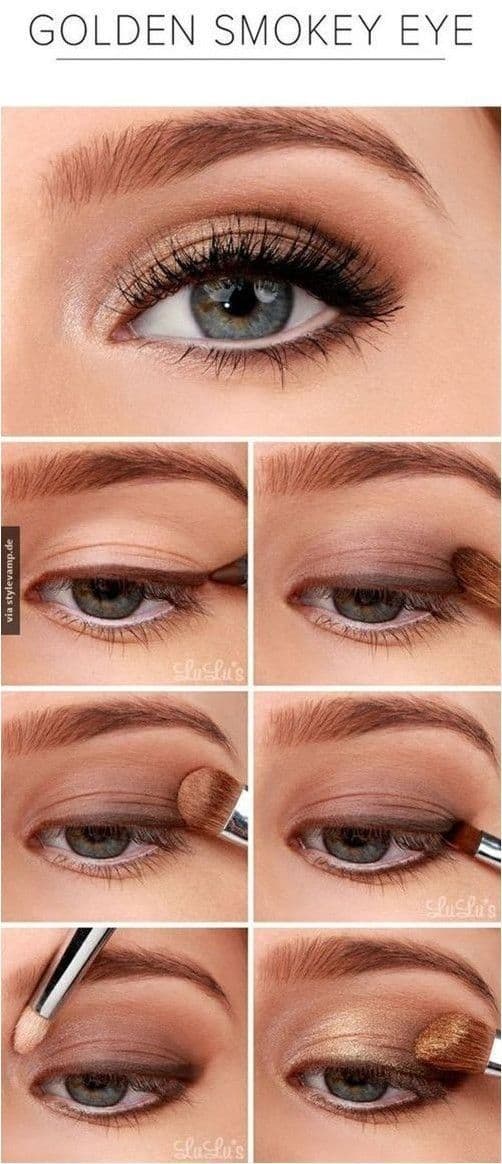
For an elegant brown eye enhancement with a metallic finish, we’ll guide you through a golden smokey eyeshadow routine that offers a perfect blend of glamour.
Essentials:
- Chocolate brown pencil eyeliner
- White pencil eyeliner
- Matte, dark brown eyeshadow
- Medium brown eyeshadow
- Champagne shimmery eyeshadow
- Golden shimmery eyeshadow
Let’s Begin:
- Start by lining your upper lash line with the chocolate brown pencil eyeliner.
- Add brightness by applying the white pencil eyeliner to your lower waterline.
- Gently pat the matte, dark brown eyeshadow onto the lower lid, spreading it evenly.
- Intensify your crease with the medium brown eyeshadow for depth.
- To add a subtle sparkle, introduce the champagne shimmery eyeshadow at the inner corner of the eye.
- For that metallic look, sweep the golden shadow starting from the inner corner, merging it towards the middle of the upper lid.
- A coat of mascara will finalize the luxurious smokey eye, ensuring your eyes are the statement of sophistication.
11. DIY Blue Icing Step by Step Makeup
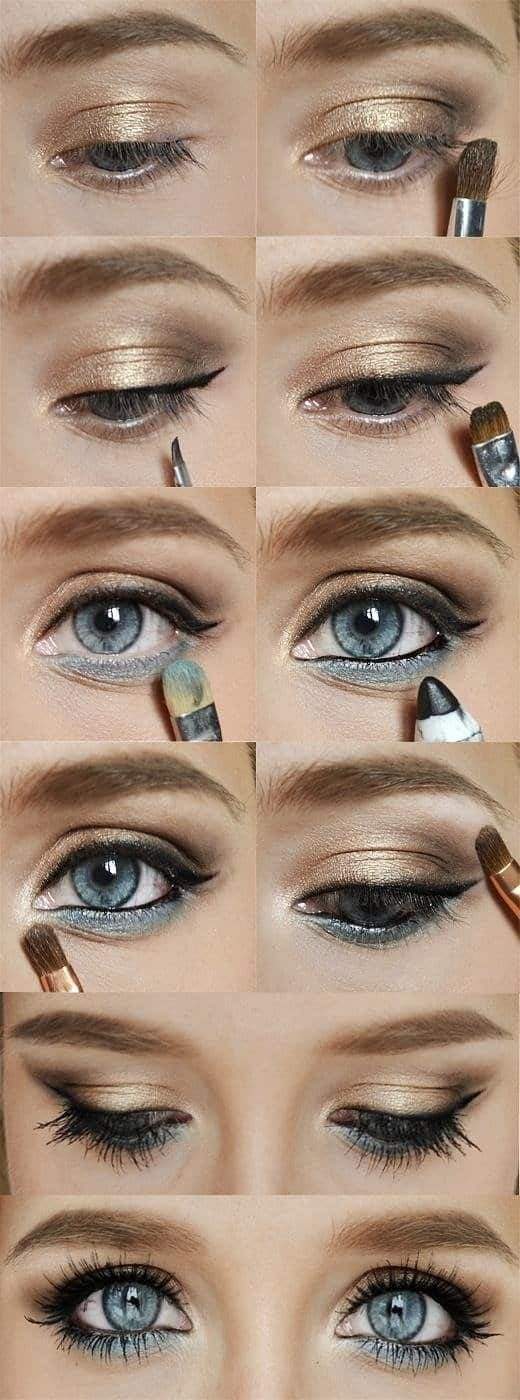
To achieve a doll-like gaze with a touch of celestial grace, we use a palette of blues and shimmery hues. Follow these steps:
- Upper Lid: Sweep a shimmery champagne shadow across your upper lid. At the corner, apply a medium dark brown, blending neatly.
- Upper Lash Line: Define with a sleek stroke of black liner to frame your eyes.
- Lower Lid: Adorn with a subtle hint of light blue shadow, extending a fine line of black eyeliner along the lower lash line.
- Golden Accent: Overlay the champagne shadow with some golden shimmer. Blend seamlessly for a radiant touch.
- Final Mascara: Conclude with two generous coats of mascara, emphasizing the upper lashes for a dramatic lift.
Now, your look captures the whimsical charm of a porcelain doll, perfect for any enchanted outing.
12. The Simple Day-Look
To achieve a classic, everyday look that emphasizes your individuality without making makeup the center of attention, we recommend the following steps:
Eye Makeup Essentials:
- Base: Apply a neutral shade eyeshadow over the upper lid.
- Accent: Add a touch of pale pink eyeshadow and blend with the base.
- Liner: A thin line of black eyeliner along the upper lash line defines the eyes.
- Crease Depth: Dark brown or black eyeshadow in the crease, smudged to merge seamlessly with the lid.
- Lower Lid: A neutral or nude eyeshadow completes the lower lid.
Lashes:
- Mascara: A light application on upper lashes enhances but keeps them looking natural.
Beginners will find this style manageable and those seeking inspiration can always turn to Instagram for variations on this simple, approachable look.