Achieving the ideal eyeshadow look requires both skill and understanding of the right techniques, especially for those new to makeup or with specific eye shapes like hooded or deep-set eyes. The journey to mastering eyeshadow application doesn’t necessitate professional status as a makeup artist. Equipped with suitable tools, a bit of patience, and knowledge of certain tips, anyone can enhance their eye makeup game. We’ll discuss how to effectively select colors, utilize eyeshadow primer for longer staying power, and choose the right brush to aid in achieving a well-defined, pretty eye look.
Application is just one part of the process; knowing how to layer the products is equally crucial. This includes understanding when and how to use concealer, the implications of eyeshadow primer versus eye primer, and the role of translucent powder in preventing your hard work from creasing. The sequence of applying eyeliner, whether on the waterline or creating a wing, and the number of coats of mascara, will affect the final result. We will outline a guide for beginners and seasoned individuals alike to ensure your eye makeup stays put and looks polished throughout the day.
Chapter Overview
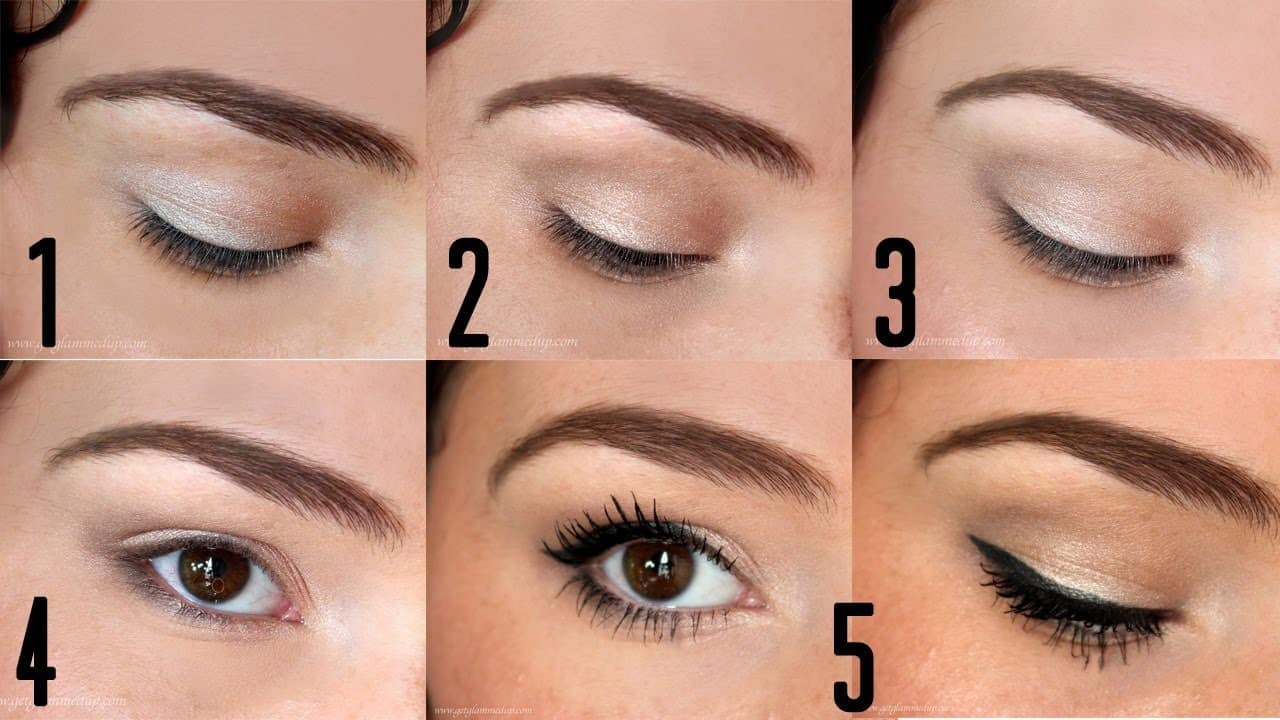
Guide For How To Apply Eyeshadow
Step 1 – Prime your lid
We begin by applying a primer to the lid to create a smooth base that helps eyeshadow last longer. A primer combats oily lids and prevents smudging. For full coverage, extend the base up to the brow bone for a dramatic effect or stop at the crease for a casual look. Brown-eyed individuals may opt for a shimmer as a base. A Q-tip or brush can be used for a more professional application.
- Tools: Fingers, Q-tip, Brush
- Pro Tip: Extend the base to the brow bone for a smoky eye effect.
Step 2 – Apply a neutral color over the lids
Next, we apply a neutral color to the lid, sweeping it up to the crease. This step acts as your shadow foundation. For a more dramatic look, choose a darker neutral shade, but be cautious as it could result in a muddy appearance on lighter skin.
- Tools: Medium eyeshadow brush
- Note: Neutral base makes the eyes stand out and covers discoloration.
Step 3 – Blend in a Darker color to the crease
We then introduce a darker shade to define the crease, starting from the inner eye and growing thicker toward the outer corner. Blending here is essential to ensure both lids match and to add depth to the eyes. Depending on the palette, we select the appropriate dark shade to complement the neutral base.
- Tools: Crease brush
- Key: Dark shades draw light, enhancing the eye’s pop.
Step 4 – Highlighter above the crease
To add dimension, we blend the lightest shade from the palette just above the crease, avoiding the brow bone. We aim for a gradient effect from light to dark, with seamless transitions.
- Application: Gradient blending
- Effect: Adds dimension and accents the shape of the eyes
Step 5 – Light shade into the inside corner of the eye
Lastly, we brighten the eyes by applying a light shade to the inner corners using the pinkie finger, a trick favored by makeup artists. This technique helps eyes appear more awake and is especially effective for events and dates.
- Tools: Pinkie finger
- Occasion: Ideal for special events to add a touch of brightness.
Choosing The Right Eyeshadow
When selecting the ideal eyeshadow, consider the texture and hue that suits you best. To simplify the process:
- Texture: For easy application, creams are favorable, yet they may crease sooner than others. Loose powders offer intense pigmentation but can be tricky to manage. Compacts are excellent for those starting out.
- Palette: Owning an eyeshadow palette with at least three shades ensures versatility—from a subtle to a more dramatic look.
- Color Selection:
- Neutral Shades: Opt for neutrals like browns and grays for an understated elegance.
- Bold Hues: If you’re aiming for a statement, pick shades that resonate with your personal style.
Keep in mind the following while choosing colors:
- Skin Tone: Select shades that complement your natural skin tone.
- Eye Color: Certain colors can enhance your eye color. For instance, bronze can make blue eyes stand out, while purples can accentuate green eyes.
- Occasion: Shimmery shadows are perfect for a night out, while mattes are ideal for a professional setting.
Consider the finish as well—shimmer can add a radiant touch, but a matte neutral shadow may be more suitable for a daytime look. Remember, the right eyeshadow not only adds color but also confidence to your appearance.
What Type Of Brush Do You Need?
- Stiff Flat Brush: Ideal for the lid to pick up and apply a high pigment load.
- Dome Brush (Soft or Stiff): Meant for the crease, perfect for a smooth color transition.
- Soft Pencil Brush: Suitable for targeting close to the lash line and hard-to-reach areas.
We recommend a blending brush for integrating darker colors seamlessly into your eyeshadow look. For precision with darker shadows or lining, an angled eyeliner brush serves well, especially along the lash line. Whereas an angled blending brush assists in contouring the eyeshadow into the desired shape with finesse.
Selecting the appropriate makeup brushes is crucial for achieving the look you desire with your eyeshadow.